Drop Down MenusCSS Drop Down MenuPure CSS Dropdown Menu

Tuesday, March 5, 2019

MY SECRET GLUTEN FREE FLOUR BLEND

Posted by Bryna Bear aka Gluten Free Baking Bear
   
    Over many years of baking gluten free I have tried different flours and countless mixtures of various flours. Finally, I am getting the perfect texture, fluffiness and moisture that I love in my baked goods.  People often ask if my baked goods are gluten free (even though they know I do not eat gIuten) and comment that it doesn’t taste different from those made with wheat flour.  
     I decided to make up a batch of my perfect blend and use it cup for cup wherever flour is needed in a recipe.  This blend is great for baked goods such as cakes, cookies, pies, biscuits, scones, streusel, etc.  It is notthe go to mix for breads, which  I am still working on.  
    It is so convenient to measure out one type of flour for each recipe instead of three or four different ones. It makes gluten free baking so much easier.  I do not know why I didn’t do this a long time ago.  
    Xanthan gum can be added to each recipe as needed.  I do not put it into the flour mixture as different baked goods require varying amounts.  Some recipes for pancakes, crepes etc don’t need any, cakes will need ¾ tsp - 1 ½ depending on the cake, while cookies only need about ½ tsp.
    Today I am sharing my secret flour blend recipe with you.  I make up several bags of it at a time for convenience as I do a lot of baking. Each batch weighs 1lb. 14 oz. or 865 gm. 
    It is best touse a kitchen scale to weigh out a precise amount of flour.  If you do not have a scale, spoon the flour blend into a measuring cup and then level it off.  Do not scoop out a measuring cup of flour directly from the container as it will be too compacted and measure out much more flour than the recipe calls for.  
     Enjoy!


 BRYNA’S SECRET GLUTEN FREE FLOUR BLEND
Makes 1lb. 14 oz./865 gm./about 8 cups
3.7 oz/105 gm. per cup

Sorghum Flour
4 cups/500 gm
Tapioca Flour
2 ½ cups/240 gm
Chickpea Flour
½ cup/60 gm
Coconut Flour
½ cup/55 gm

DIRECTIONS
Add all of the flours to a bag or container.  Seal and shake to mix well.

Its best to use a kitchen scale to weigh out a precise amount of flour.

If you do not have a scale spoon the flour blend into a measuring cup and then level it off.  

Do not scoop out a measuring cup of flour directly from the container as it will be too compacted and hold much more flour than the recipe calls for.
A bag of my secret gf flour blend.


Wednesday, January 23, 2019

GLUTEN FREE CHEESECAKE BROWNIES with DAIRY FREE Directions


Posted by Bryna Bear aka Gluten Free Baking Bear

    Yum!  These Cheesecake Brownies are to die for!  I love the texture of the brownie layer and the how delicious it is with the cheese layer. I got the recipe from a friend and I have made them several times to rave reviews.  My usual reply to someone who wants the recipe for something I bake is “the recipe is in my blog”, but it wasn’t there!  So, by popular demand, I am posting the recipe today.
    It is easy to make.  No xanthan gum is needed and there is just one gluten free flour:  tapioca.  You can make the recipe dairy free by replacing milk and cream cheese with dairy free milk and cream cheese.  

GLUTEN FREE CHEESECAKE BROWNIES


INGREDIENTS

CREAM CHEESE LAYER
8 oz.
Cream Cheese (for dairy free use dairy free cream cheese)
½ cup
Sugar
1 large
Egg - at room temperature
1 tsp.
Vanilla Extract


BROWNIE LAYER
6 oz./1 cup
Chocolate Chips (for dairy free use dairy free chips)
½ cup
Sugar
1 tsp.
Vanila Extract
2 large
Eggs - at room temperature
3 Tbs.
Tapioca Flour
1 Tbs.
Dutch Cocoa Powder
1 ½ tsp.
Baking Powder
⅛ tsp.
Sea Salt
3 oz./½ cup
Chocolate Chips (for dairy free use dairy free chips)
DIRECTIONS
  1. Preheat oven to 350.  Prepare an 8”x8” square baking pan by lining it with parchment paper.  Brush the paper with a light tasting oil.
  2. In a small bowl beat cream cheese, sugar, egg & vanilla until well combined, soft and smooth. Set aside.
  3. In a medium sized microwave safe bowl, add the chocolate and melt it in the microwave at 30 second intervals, stirring after every interval until the chocolate is melted.  You can also melt the chocolate the by putting the bowl over a pot of hot water, stirring until it is melted.
  4. Add the sugar and vanilla and beat 30 seconds with an electric hand mixer.
  5. Add one egg and beat 30 seconds.
  6. Add the second egg and beat 1 minute until smooth.
  7. Add the tapioca flour, Dutch cocoa, baking powder and salt and mix until combined, then scrape down the sides and mix again.
  8. Stir in chocolate chips by hand.
  9. Pour the chocolate mixture into the prepared pan and smooth out the top.
  10. Dot the top of the chocolate mixture with spoonfuls of the cream cheese mixture.  Run a knife back and forth across the pan to marbleize the cream cheese into the chocolate mixture.

  11. Bake 50 minutes.
  12. Cool in the pan until room temperature.
  13. Cover with plastic wrap and chill in the fridge for several hours or overnight before slicing into squares or bars.
  14. Store leftovers in the fridge.

Wednesday, November 28, 2018

GF POTATO LATKES (PANCAKES) FOR A CROWD


Posted by Bryna Bear aka Gluten Free Baking Bear

    
     Soon it will be Hanukkah!  Called the “Festival of Lights” this holiday is celebrated with saying prayers, lighting a menorah (a menorah is a candelabra that usually holds 9 candles), playing dreidel games (a dreidel is a 4 sided top with a letter on each side), singing and eating fried foods.
    Hanukkah in a nutshell:  About two thousand years ago after much fighting, the temple in Jerusalem was liberated by the Maccabees from the Greeks and Syrians.  To rededicate the temple, oil was burned in the menorah. There was only enough oil to last for one day. Miraculously the oil lasted not one but eight days until more oil arrived. This miracle of the oil is celebrated by lighting the menorah for eight nights. 
     Many Hanukkah foods are fried or made with oil to commemorate the miracle of the oil.  The most popular Hanukkah foods are potato latkes (pancakes) and sufganiyot (fried doughnuts).  This year I am posting my recipe for Gluten Free Latkes or Potato Pancakes.
     I bake my latkes on a baking sheet with a thin layer of oil on it.  Baking is less time consuming and easier than pan frying when making a large amount for a crowd.  The baked latkes are crisp yet less greasy than pan fried ones. 
     Latkes are made with a few simple ingredients, but they taste so delicious.  Traditionally they are served with apple sauce and/or sour cream.  Today there are many variations of the plain potato latke, including sweet potato, zucchini, parsnip, cauliflower, cheese and even Brussel sprouts. 
     Last year I made vegan (no egg or dairy) latkes for my son and they were really good also.  I will include both recipes.

POTATO LATKES
Makes about 6-8 three-inch latkes
(enough for 2-3 people depending upon appetites)
(double, triple etc. the recipe as needed)
Ingredients
1 lb.
Russet Potatoes (starchy potatoes are best)
¼ lb
Onions
2 Tbs.
Corn Starch (makes crispier latkes) or Potato Starch
1 large
Egg
½ tsp.
Baking Soda (makes the latkes less dense)
½ tsp.
 Sea Salt
¼ tsp.
Pepper
½ to 1 cup
Olive Oil for Oven Frying (Olive oil gives a great flavor)


VEGAN POTATO LATKES
Makes about 6-8 three-inch latkes
(enough for 2-3 people depending upon appetites)
(double, triple etc. the recipe as needed)

Ingredients
2
Egg Replacers of choice (I used ¼ cup water, 2 Tbs. oil, and 4 tsp. baking powder.)
2 Tbs.
Corn Starch (makes for crispier latkes) or Potato Starch
¼ tsp.
Baking Powder (makes a less dense latke)
½ tsp.
Sea Salt
¼ tsp.
Pepper
1 lb.
Russet Potatoes (starchy potatoes are best)
¼ lb.
Onions
½ cup to 1 cup
Olive Oil for Oven Frying (olive oil gives a great flavor)


Directions
1)      Preheat the oven to 450.
2)      Pour ¼ inch oil into a rimmed baking pan. When the oven is preheated put the baking pan into the oven for 20 minutes to get the oil hot.
3)      Wash and peel (peeling is optional) the potatoes.  Using a box grater or the smaller grating blade on a food processor, grate the potatoes and place into a bowl of water, this will keep the potatoes from turning grayish.
Potatoes grated in food processor, already turning color.
4)      Peel and finely grate the onion or run it through the food processor using the blade attachment.
5)      Line a sieve with cheese cloth.  Place as much of the grated potatoes in the cloth as will fit and still allow you to wrap them completely with the cloth.  Gather the cheese cloth around the potatoes and form a knot or twist together the gathered ends and squeeze or wring all the moisture out of the potatoes.  Repeat with the rest of the potatoes until all the extra moisture has been squeezed out.  Repeat with the grated onions as well.  Removing as much excess liquid as possible is crucial for getting a crisp pancake.
Grated potatoes in a strainer lined with cheese cloth.


The grated potatoes and onions gathered up in the cheese cloth
ready to squeeze the excess liquid out.
6)      Add the grated potatoes and onions to a large bowl.  Add the rest of the ingredients (except the cooking oil) and mix well.  I find it best to use my clean hands to mix this up.
Potatoes and onions with excess liquid squeezed out.


All the ingredients (except the oil for cooking) in the bowl.
Ready to mix together.
7)      Carefully take the oil filled baking pan out of the oven and place on the stove top.  Scoop out portions of the potato mixture into the oil and flatten the center.
Latke mixture scooped out into the hot oil and flattened a bit.
8)      Bake for 6-8 minutes or until browned and crisp.  Turn the latkes and bake an additional 5-8 minutes depending upon how dark and crisp you prefer yours to be.
Latkes after cooking for 8 minutes.


Latkes flipped over and ready to bake an additional 5 minutes.
9)      Drain latkes on paper towels.
Draining excess oil on paper towels.
10)   Serve right away for the crispest pancakes.  If you want to make them ahead and then reheat: spread out the cold latkes on a shallow baking sheet and reheat in a hot oven (450) for about 6-8 minutes until heated through.
11)   If you want to pan fry the latkes: Heat ¼ inch of oil in a frying pan over medium high heat.  Do not start to fry until a piece of potato sizzles when dropped in the oil. Scoop out a portion of potato mixture and flatten with a spatula. Repeat until the pan is full about 4 pancakes.  Cook 5-8 minutes until browned, but do not wait until the edges get dark or they will burn when the other side is cooking.  Flip and cook 3-4 minutes on the other side.  
12)   Leftovers should be refrigerated or frozen and reheated as needed.

13)   Traditionally these are served with applesauce and or sour cream, but you can eat them plain or with whatever you like.

Monday, October 22, 2018

GLUTEN FREE CINNAMON ROLLS with Dairy Free Instructions


Posted by Bryna Bear aka Gluten Free Baking Bear
     I love cinnamon rolls!  Every time I enter a mall there is that wonderful smell of Cinnabon rolls.  Why don’t they have gluten free Cinnabon rolls at the mall?  If I want to eat a cinnamon roll I must bake it.  I found this recipe on the Recreating Happiness blog.  It is great.  Delicious, soft and gives you an experience that is absolutely equal to wheat cinnamon rolls.
     I made these a few times. The first time as written, then I switched up the flours. I just don't like using rice flour in baking.  Sweet rice flour is fine, but regular rice or brown rice flour makes the end product odd after it is a day old. When I say odd I mean the texture changes from ‘“I can’t believe this is gluten free” the first day to “This is definitely gluten free” the next day.  I find that substituting either sweet rice flour or sorghum for rice flour in a recipe produces good results. Most of the starchy flours like potato starch, tapioca, arrowroot, corn starch, etc. are usually interchangeable.  I tend to use tapioca since I have a lot on hand for making batches of Brazilian Cheese Rolls or Yeast Free Bagels.  I use the coconut flour in place of almond flour because some people I know have nut allergies and it is also less expensive.  You do need one or the other in the recipe to make the rolls soft and fluffy.  I made them with and without the cream cheese frosting and actually prefer them plain.  The cream cheese frosting makes these rolls a Cinnabon copycat.
     Best eaten the same day, leftover rolls eaten after the first day will be better if reheated.  Enjoy!


GLUTEN FREE CINNAMON ROLLS
Makes 8 rolls

INGREDIENTS
DOUGH
cup
Milk
for Dairy Free use non dairy milk of choice.
1 Tbs.
Butter
for Dairy Free use margarine or oil or vegan butter
2 ¼ tsp./1 packet/7gm
Yeast
¼ cup
Sugar
¾ cup
Tapioca Flour
¼ cup
Coconut Flour
½ cup
Sorghum Flour
½ tsp.
Baking Soda
1 ½ tsp.
Xanthan Gum
2 ½ tsp.
Baking Powder
½ tsp.
Salt
1 large
Egg
¼ cup
Vegetable oil with milk taste such as sunflower or canola
½ tsp.
Vanilla Extract


FILLING
cup
Butter - soft
for Dairy Free use vegan butter, margarine or ¼ cup oil
½ cup
Brown Sugar
2 Tbs.
Cinnamon


FROSTING
3 Tbs.
Butter-soft
for Dairy Free use use vegan butter or margarine
2 Tbs.
Cream Cheese-soft
for Dairy Free use vegan or dairy free cream cheese
¾ cup
Powdered Sugar
½ tsp.
Vanilla Extract
pinch
Salt


DIRECTIONS
1)    Preheat oven to 350℉.  Grease and lightly flour a pie pan or 9” round cake pan.
Greased and floured pie tin.
2)    In the bowl of a stand mixer mix the yeast and sugar.
3)    Place the milk and 1 Tbs. butter or oil in a microwave safe bowl or measuring cup and heat to 110-115℉ and add to the yeast mixture.  Stir and allow to proof for 10 minutes.  The yeast mixture should ‘foam up’. If the yeast doesn’t  foam up check the expiration date on the yeast.  If it is fresh you may have killed the yeast by using milk that was too hot.  Try to proof the yeast again being careful about the temperature of the milk.  If the yeast is not fresh you will need to get fresh yeast before proofing again.
4)    While the yeast is proofing add the flours, baking soda, baking powder, salt & xanthan gum to a medium bowl and mix well.  Set aside.
5)    When the yeast has ‘foamed up’ add the egg, ¼ cup oil & ½ tsp. vanilla extract and mix well.
6)    Add the flour mixture to the yeast mixture in the bowl of the stand mixer. Beat 2 ½ minutes, scraping down the bowl after the first ½ minute. The dough should be smooth and like a thick cake batter.
Dough all mixed.
7)    Place plastic wrap on the counter and, using a pastry brush, brush the plastic wrap with oil.
8)    Use a large silicone spatula to scrape the dough out onto the plastic wrap.
9)    Cover the dough with another piece of plastic wrap and, using a rolling pin, roll the dough out into a rectangle (approximately)10”x13”. 
Dough rolled into a rectangle between two pieces of plastic wrap.
The bottom plastic has been brushed with oil to prevent sticking.
10) Remove the top piece of plastic wrap and discard. 
11) The Filling: Gently spread out the filling butter or vegan butter or margarine or oil over the dough, leave a ½” border all around the edges.
12) Mix the brown sugar and cinnamon together in a small bowl.  Sprinkle evenly over the dough leaving a border around the edges. 
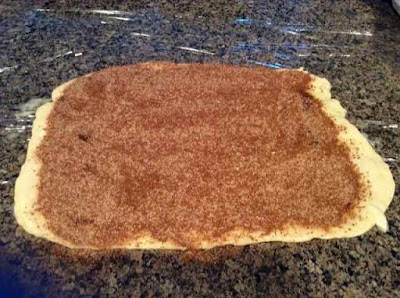
Dough with filling. 
13) Use the plastic wrap to help lift the long edge of the dough.  Still using the plastic wrap lift and roll the dough until it is rolled into a long log.
Dough rolled into a log and sliced into 8 pieces.
14) Oil a long knife and use it to cut the dough into 8 slices.
15) Gently lift the slices into the prepared pan.  Place one in the center and the other slices around the edges of the pan.  To make it easier to transfer the pieces you can grease a spatula lift the slices.
Raw rolls in pan.
16) Cover the rolls with a dish towel and allow to rise for 15 minutes.
17) Bake 22-27 minutes until the tops are golden brown.
Baked GF Cinnamon Rolls.
18) If using the frosting:  While the rolls are baking beat all the frosting ingredients together until smooth.  Spread over the tops of the rolls as soon as they come out of the oven.
Frosting.

Frosting put on most of the rolls right out of the oven.
I left some plain to see how they were.
I actually prefer them unfrosted.

Frosted warm GF Cinnamon Roll!

Best if eaten the same day.  Reheat any leftovers eaten after the first day.


You can prepare the rolls a day ahead, cover with plastic wrap and store in the fridge until ready to bake.  Allow the rolls to rest at room temperature for at least 25 minutes before baking.