Posted by Bryna Bear aka Gluten Free Baking Bear
I
love cinnamon rolls!
Every time I
enter a mall there is that wonderful smell of Cinnabon rolls.
Why don’t they have gluten free
Cinnabon rolls at the mall?
If I
want to eat a cinnamon roll I must bake it.
I found this recipe on the
Recreating Happiness blog.
It is great.
Delicious, soft and gives you an experience that is
absolutely equal to wheat cinnamon rolls.
I
made these a few times. The first time as written, then I switched up the
flours. I just don't like using rice flour in baking.
Sweet rice flour is fine, but regular rice or brown rice
flour makes the end product odd after it is a day old. When I say odd I mean
the texture changes from ‘“I can’t believe this is gluten free” the first day
to “This is definitely gluten free” the next day.
I find that substituting either sweet rice flour or sorghum
for rice flour in a recipe produces good results. Most of the starchy flours
like potato starch, tapioca, arrowroot, corn starch, etc. are usually
interchangeable.
I tend to use
tapioca since I have a lot on hand for making batches of
Brazilian Cheese Rolls
or
Yeast Free Bagels.
I use the
coconut flour in place of almond flour because some people I know have nut allergies
and it is also less expensive.
You
do need one or the other in the recipe to make the rolls soft and fluffy.
I made them with and without the cream
cheese frosting and actually prefer them plain.
The cream cheese frosting makes these rolls a Cinnabon
copycat.
Best eaten the same day, leftover rolls eaten after the first day will
be better if reheated. Enjoy!
GLUTEN FREE CINNAMON
ROLLS
Makes 8 rolls
INGREDIENTS
DOUGH
⅔
cup
|
Milk
for Dairy Free use non dairy milk of
choice.
|
1 Tbs.
|
Butter
for Dairy Free use margarine or oil
or vegan butter
|
2 ¼ tsp./1 packet/7gm
|
Yeast
|
¼ cup
|
Sugar
|
¾ cup
|
Tapioca Flour
|
¼ cup
|
Coconut Flour
|
½ cup
|
Sorghum Flour
|
½ tsp.
|
Baking Soda
|
1 ½ tsp.
|
Xanthan Gum
|
2 ½ tsp.
|
Baking Powder
|
½ tsp.
|
Salt
|
1 large
|
Egg
|
¼ cup
|
Vegetable oil with milk taste such
as sunflower or canola
|
½ tsp.
|
Vanilla Extract
|
FILLING
⅓
cup
|
Butter - soft
for Dairy Free use vegan butter,
margarine or ¼ cup oil
|
½ cup
|
Brown Sugar
|
2 Tbs.
|
Cinnamon
|
FROSTING
3 Tbs.
|
Butter-soft
for Dairy Free use use vegan butter
or margarine
|
2 Tbs.
|
Cream Cheese-soft
for Dairy Free use vegan or dairy
free cream cheese
|
¾ cup
|
Powdered Sugar
|
½ tsp.
|
Vanilla Extract
|
pinch
|
Salt
|
DIRECTIONS
1) Preheat
oven to 350℉. Grease and lightly
flour a pie pan or 9” round cake pan.
 |
| Greased and floured pie tin. |
2) In
the bowl of a stand mixer mix the yeast and sugar.
3) Place
the milk and 1 Tbs. butter or oil in a microwave safe bowl or measuring cup and
heat to 110-115℉ and add to the yeast mixture. Stir and allow to proof for 10 minutes. The yeast mixture should ‘foam up’. If
the yeast doesn’t foam up check
the expiration date on the yeast.
If it is fresh you may have killed the yeast by using milk that was too
hot. Try to proof the yeast again
being careful about the temperature of the milk. If the yeast is not fresh you will need to get fresh yeast
before proofing again.
4) While
the yeast is proofing add the flours, baking soda, baking powder, salt &
xanthan gum to a medium bowl and mix well. Set aside.
5) When
the yeast has ‘foamed up’ add the egg, ¼ cup oil & ½ tsp. vanilla extract
and mix well.
6) Add
the flour mixture to the yeast mixture in the bowl of the stand mixer. Beat 2 ½
minutes, scraping down the bowl after the first ½ minute. The dough should be
smooth and like a thick cake batter.
 |
| Dough all mixed. |
7) Place
plastic wrap on the counter and, using a pastry brush, brush the plastic wrap
with oil.
8) Use
a large silicone spatula to scrape the dough out onto the plastic wrap.
9) Cover
the dough with another piece of plastic wrap and, using a rolling pin, roll the
dough out into a
rectangle (approximately)10”x13”.
 |
Dough rolled into a rectangle between two pieces of plastic wrap.
The bottom plastic has been brushed with oil to prevent sticking. |
10) Remove the
top piece of plastic wrap and discard.
11) The
Filling: Gently spread out the filling butter or vegan butter or margarine
or oil over the dough, leave a ½” border all around the edges.
12) Mix the
brown sugar and cinnamon together in a small bowl. Sprinkle evenly over the dough leaving a border around the
edges.
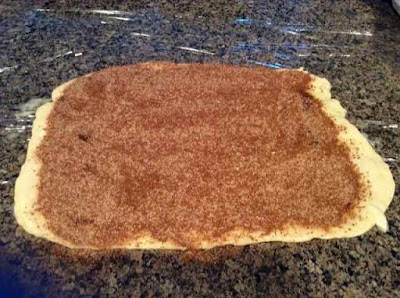 |
Dough with filling. |
13) Use the
plastic wrap to help lift the long edge of the dough. Still using the plastic wrap lift and roll the dough until
it is rolled into a long log.
 |
| Dough rolled into a log and sliced into 8 pieces. |
14) Oil a long
knife and use it to cut the dough into 8 slices.
15) Gently
lift the slices into the prepared pan.
Place one in the center and the other slices around the edges of the
pan. To make it easier to transfer
the pieces you can grease a spatula lift the slices.
 |
| Raw rolls in pan. |
16) Cover the
rolls with a dish towel and allow to rise for 15 minutes.
17) Bake 22-27
minutes until the tops are golden brown.
 |
| Baked GF Cinnamon Rolls. |
18) If
using the frosting: While the
rolls are baking beat all the frosting ingredients together until smooth. Spread over the tops of the rolls as
soon as they come out of the oven.
 |
| Frosting. |
 |
Frosting put on most of the rolls right out of the oven.
I left some plain to see how they were.
I actually prefer them unfrosted. |
 |
| Frosted warm GF Cinnamon Roll! |
Best if eaten the same day.
Reheat any leftovers eaten after the first day.
You can prepare the rolls a day ahead, cover with plastic wrap
and store in the fridge until ready to bake. Allow the rolls to rest at room temperature for at least 25
minutes before baking.


